When it comes to any form of online marketing, there’s a phrase you’ll come across quite often.
The money is in the list. This is, of course, referring to your email list and how important building an email list is to generate a sustainable income with your website, blog, or online business. It’s all in the list.
Getting people to sign up for your list is an art, and one of the best ways is to offer them something in return, I.e. an opt-in bonus.
In this article, I’m going to show you exactly how to create an opt-in form for your website so that your list grows along with your income. ?
What you’ll learn:
- What an opt-in form is
- Why you need one for your website or blog
- Some of the best types of opt-in forms
- How to create an opt-in form with ConvertKit
- How to insert opt-in forms onto posts & pages

If you want to read this later, please save it to Pinterest.
Skip ahead:
What Is An Opt-In Form?
Before we get to the creating, let me clear up what exactly an opt-in form is for those of you that do not know.
In its simplest of forms, an opt-in is just a form that someone completes on your website. They give you their email address, and name & agree to allow you to contact them via email. This is the process of adding them to your list.
But why would someone want to just give you their email address you may be thinking. People generally only voluntarily give someone their email addresses in order to get something in return.
This is the value proposition, you need to provide someone value before you can expect something in return (their email, a sale, referral, etc.).
Sometimes the content that you provide on your website is valuable enough and you’ll have readers opting into your newsletter. This is great, but a lot of the time it takes a little bit more effort to convince people that you can provide them with value.
This is where the opt-in bonus (or content upgrade, incentive, freebie, or whatever other name you want to call it) comes into play.
This is a bonus that you send to someone that opts into your email list.
This could be extra information about the topic, a video, downloadable content, printables, checklists, etc.
The most important thing is that the opt-in is closely related to the article you’re including it on, or with your website and niche in general if you’re placing it in other areas across your site.
What is an opt-in? It’s exactly what it says it is.
Why should you gather emails with an opt-in form?
Before we look at how to create an opt-in form for your website, let’s look at why you should use one.
There are a number of reasons, and here are some of the most important ones.
It’s direct
Unlike having to optimize your content so people can find you, with email, you can reach out to your readers directly. This is especially useful with search engine updates that can affect how many visits you receive daily.
People check their emails often
Unlike social media, people tend to check their emails regularly and have a sense of urgency tied to them. These days important messages get delivered via email as opposed to telephone, fax or regular old fashion posted mail.
This gives you the chance to put your site above the competition you may face in social networks or search engines and you can receive near-immediate action.
You own your email list
A social media following can be a very powerful tool when it comes to getting your content seen. But what happens if that network goes bust or if they delete your account?
That’s right, you’re going to be left there to twiddle your thumbs and start from scratch. Whereas, if you have your own website & email list, you are in control.
This means you can customize your emails to look and deliver whatever you want. You can reach out to people & direct them to new social media followings, articles, websites, etc. You’re not reliant on external factors like changes to social media algorithms, new rules, and other variables that can dramatically affect your exposure & income.
Another important and often overlooked aspect of email is that your list is a very valued commodity for brands and companies that may want to work with you.
It’s your responsibility to not spam your list and to only link to brands and businesses you trust. Once you’ve vetted a brand and you think they’ll make a great partner for your business though, you can use your email list to generate better rates. Email metrics (open, click rates, etc.) are far easier for brands to quantify than social media numbers, and you can ask to be paid accordingly.
Email can build trust
They say that it takes 6 to 8 points of contact in order to generate a sale or transaction.
Do you think it would be easier for someone to stumble upon your article or website 6 to 8 times or for you to get them to opt-in to your email list on their first visit and then deliver the 5 to 7 points of contact via email? The second option, of course.
This is the process of converting cold leads to warm leads. Obviously, not everyone is going to buy, but when they do, it’s from people, brands, and businesses that they trust, as opposed to just landing on a random website & clicking the buy button.
Even if you’re not selling or monetizing your list directly, you’re building relationships with readers through direct contact. You could then monetize this relationship indirectly through sponsorships, advertising, etc. The money really is the list.
Lastly, utilize an SPF record checker to ensure proper email deliverability, enhance the effectiveness of your email campaigns and build trustful relationships.
10 Best Performing Email Capture Types
If you haven’t created an opt-in yet, here are some of the best-performing opt-in types to give you a little bit of inspiration to grow your list.
- Free Courses
- eBooks
- Checklists
- Workbooks
- Resource library
- Video or audio
- PDF blog post
- Cheatsheet
- Case studies
- Reports
There are many different ways for you to provide your audience with value. Any opt-in form that can clearly show how the reader will benefit from signing up for it, will perform well.
If you haven’t finished creating your opt-in yet, add a newsletter opt-in. If your readers find a lot of value in the content you post, you’ll be surprised how many will actually join your newsletter.
How To Create An Opt-In Form For Your Blog
When it comes to creating opt-in forms there are many options on the market.
Optinmonster is one of the top companies around, but they’re quite pricey, which is why ConvertKit is my top Optinmonster alternative.
The interface is remarkably easy to use, the customer support is top-notch and always gets back to me quickly. Furthermore, the company was founded by a blogger so they know exactly what influencers & bloggers need from an email service.
This guide will take you step-by-step through how to create an opt-in form for your website using ConvertKit & WordPress.
If you are new to ConvertKit, you can try them for free (under 300 subscribers).
Now let’s create an opt-in form.
1. How To Create An Opt-In Form With ConvertKit.
To get started, we need to open up the ConvertKit dashboard, in the menu bar above select Forms.

Scroll down & click the New Form button.

Next, click the box on the left that says Form.

For a form that you can place easily anywhere on your site, select Inline.

ConvertKit makes it easy to get started with a few basic templates, so choose the one that best fits your opt-in or branding.
If you have a minimal look, then go for Minimal, if you have a graphic for your opt-in, select Full. For this tutorial, I am going to select Full.
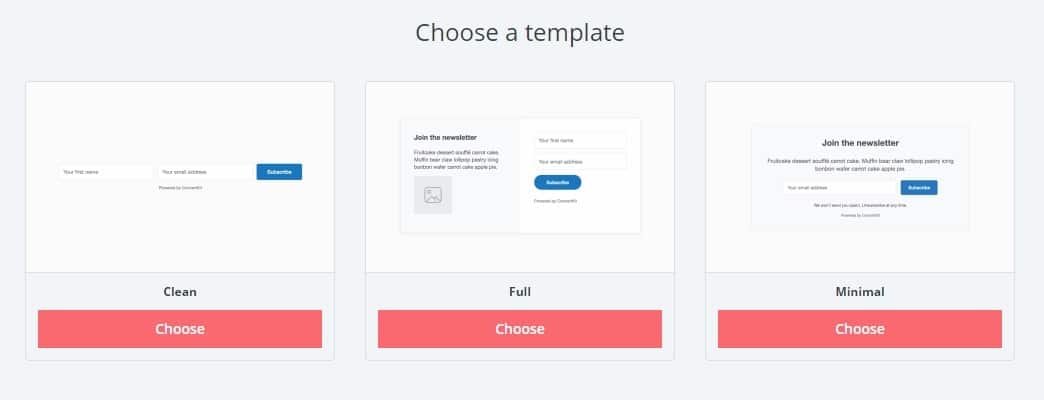
Now you should see the editor screen for your form.
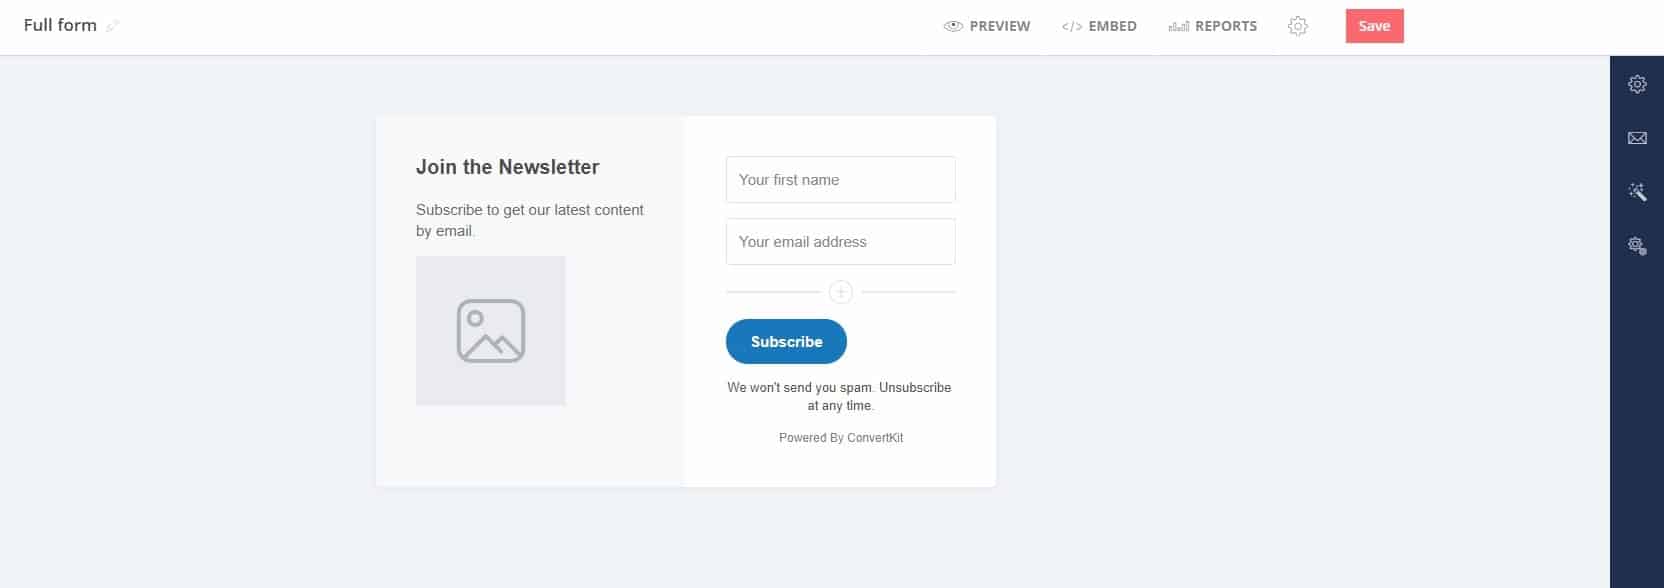
Here you can do a number of different things:
- You can give the form a name so you can easily find it later.
- Add custom header text & subheader text.
- Insert a graphic for your form.
- Add a short note beneath the opt-in button.
- Change the opt-in button text.
- Etcetera.
As you can see demonstrated in the image below.
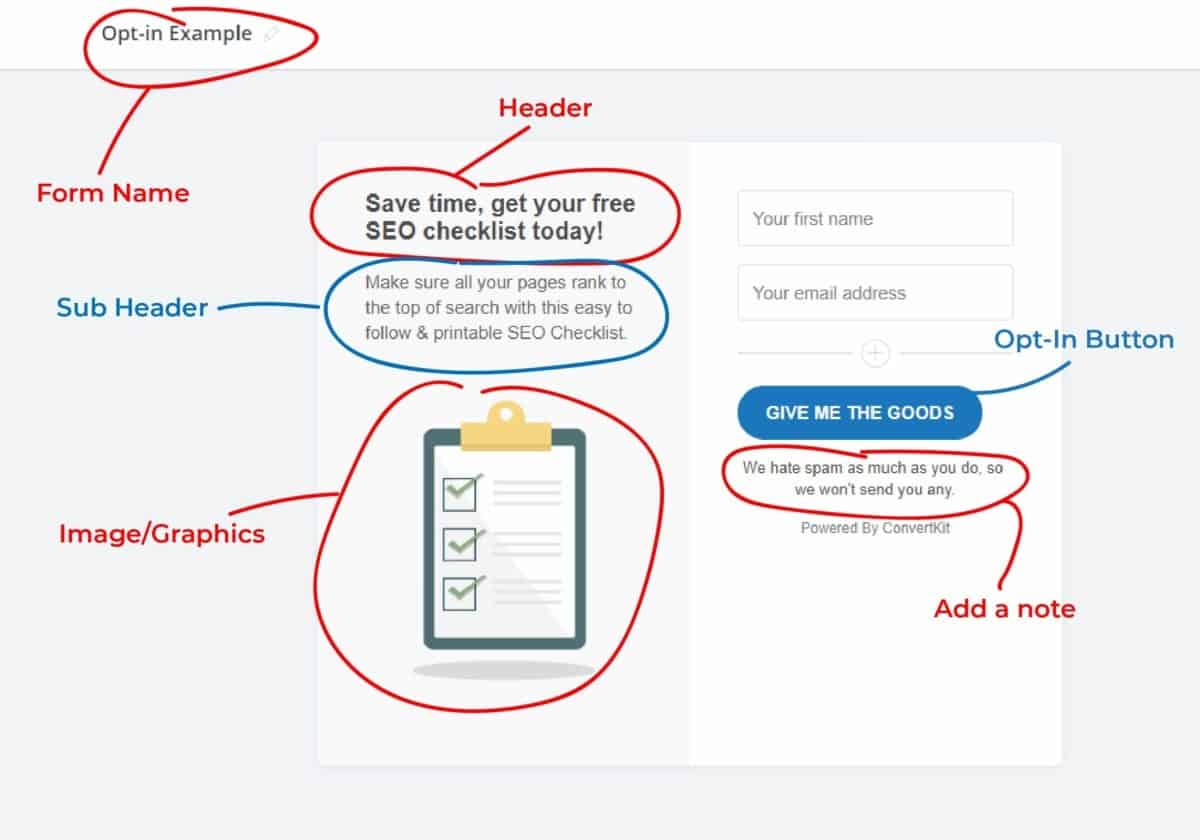
Click on the area you want to edit and a menu will open up with more details on the right of your screen.
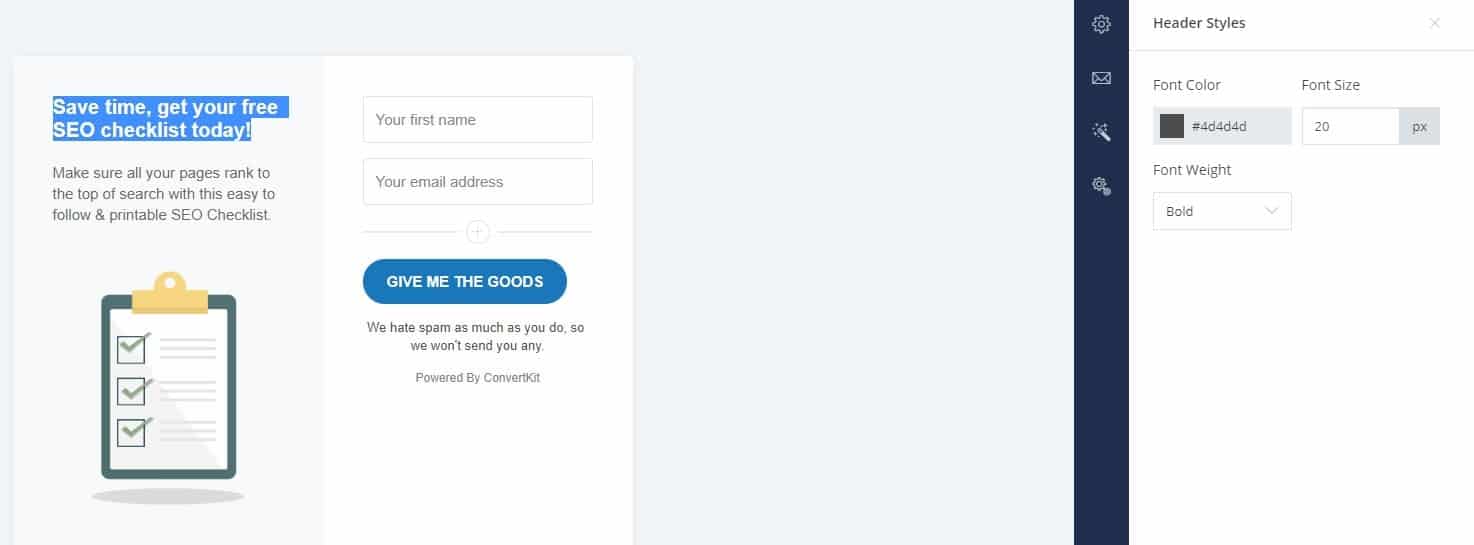
Add your text, and graphics, and adjust some of the basic styling options that come with each section. To change the fields (where your readers will input their name, email, etc.) select the field you want to change and edit the information on the right.
To insert a new field, select the + icon above the opt-in button to create a new field. Add the required information on the right, like a website address as I have done in the example below.
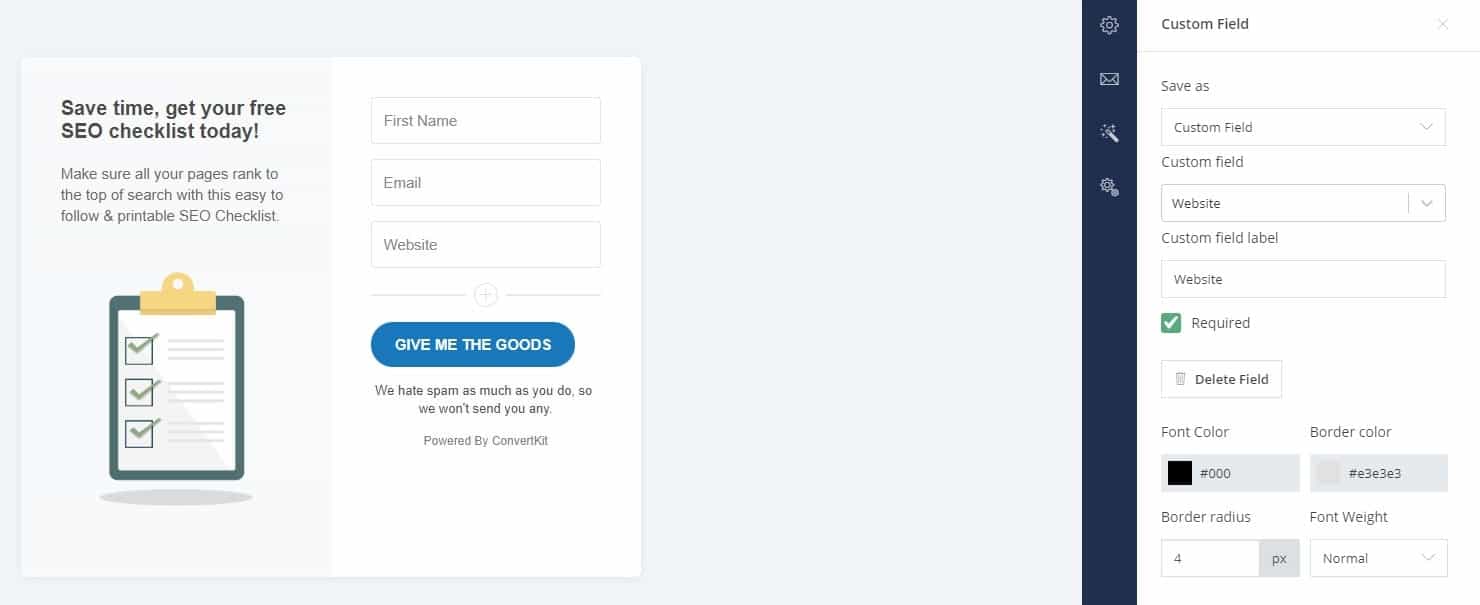
P.s. for most forms, the name and email are enough. ?
If you select the wand icon on the right, you’ll have some more styling options. You can adjust the background color, switch to a different template & even add custom CSS to your form.

Select the preview button from the top menu to see how your form is looking & if you want to remove the Powered By ConvertKit branding at the bottom, click on the branding and then deselect the box on the right.
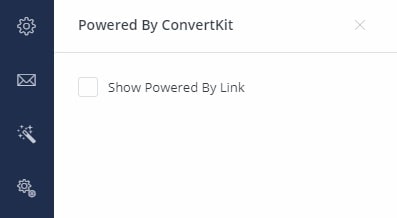
We’re almost done setting up our form.
Go ahead and select the gear icon on the right menu to edit the thank you message that appears when people subscribe, or alternatively, you can redirect them to another page.

The envelope icon beneath that gives you the option of sending viewers a confirmation email before they’re added to your list. Please note, that this isn’t the same as a GDPR compliance confirmation, you can set a GDPR compliance confirmation box to appear only to viewers that are inside of the EU in your Account Settings.
If you’d like your readers to double opt-in, make sure the Send incentive email box is checked, otherwise leave it unchecked and we can move on.
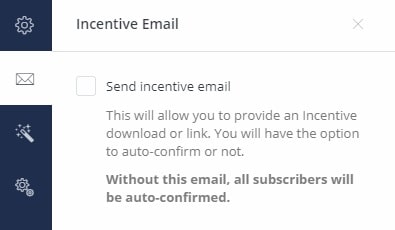
(P.s. You can ignore the rest as we’re going to send the opt-in bonus through an email sequence in the next step.)
Once all that is complete, don’t forget to save your work… Actually, make sure to save between each step, it’s just good practice and you won’t be frustrated with having to do things over.
2. Create An Email Sequence To Deliver The Opt-In
Once you’ve created a form, the next step in this How to create an Opt-in form tutorial is to put together the email that your readers will receive when they opt in.
To do this, we need to click on Sequences from the top menu & then select New Sequence.

Give your sequence a name, and then select Create Sequence.
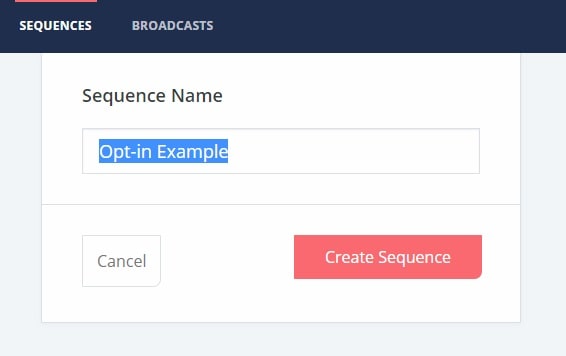
The next screen that you will see is the email sequence builder.
On the left are individual emails in the sequence & on the right are the contents of the selected email.
As you can see below, when you create a sequence, a template will automatically generate & we can then start editing it.
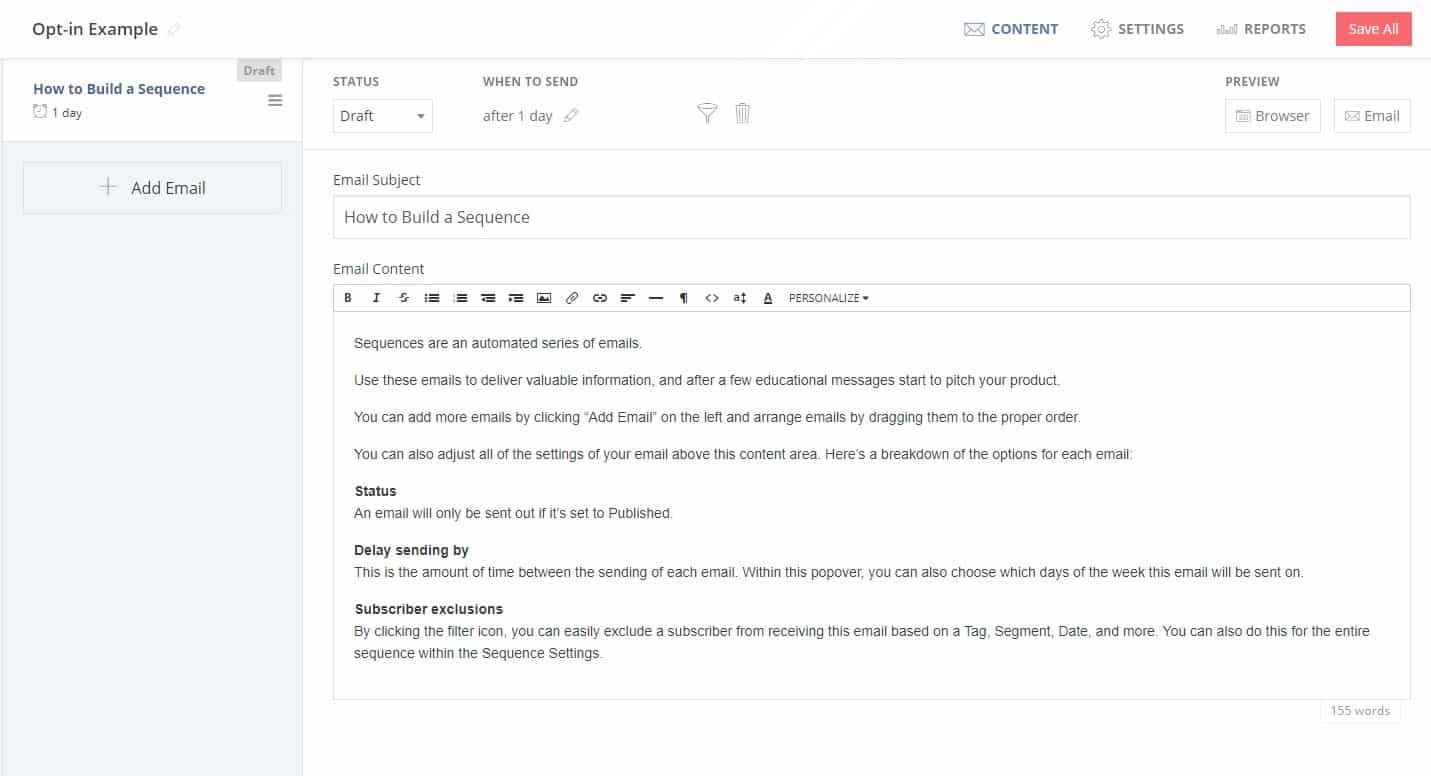
Change your subject to something that will let your readers know that their opt-in has arrived & then add some text to the body of the email.
This can be a very simple few sentences just handing over the opt-in bonus allowing you to introduce yourself later, or you can include the opt-in bonus and introduce yourself right then and there.
Regardless of which method you choose, you’re going to need to include your opt-in bonus.
Don’t worry, I haven’t gotten ahead of myself just yet… The easiest way for you to deliver your opt-in is to upload it to a storage service (Dropbox, Google Drive, Amazon S3, etc.).
For each of these services, it’s pretty similar; you upload the file (your opt-in bonus), get a sharing or download link, make sure that the file is visible to the public & that’s it.
Here’s a quick guide to uploading a file with Google Drive. (As I mentioned though, it’s a similar process on Dropbox, Amazon S3, etc.)
- Open your Google Drive.
- Drag & drop your opt-in bonus into the drive or select +New and select the file.
- Right-Click on the uploaded file & select Share.
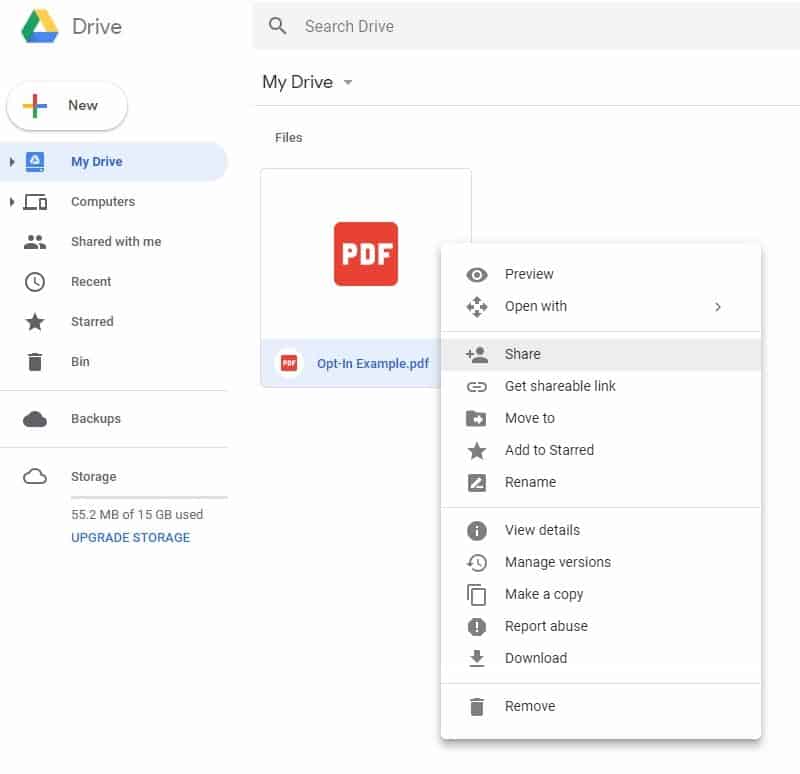
- Click on the top drop-down menu & select More.

- Select the first option: On–Public on the web.
- Save.
- Select Copy Link and that’s it.
We can now head back to ConvertKit & link to this opt-in file in our email sequence.
As you can see from the example below, I’ve just written out a few words so that the email doesn’t look too empty & then linked some text to the opt-in bonus.

To create this link, highlight the text you want to use to link to your opt-in bonus & select the Link option from the text editor menu above.
Copy the link into the URL field, check the Open Link in New Tab option if you wish, and then select Insert to place your link.
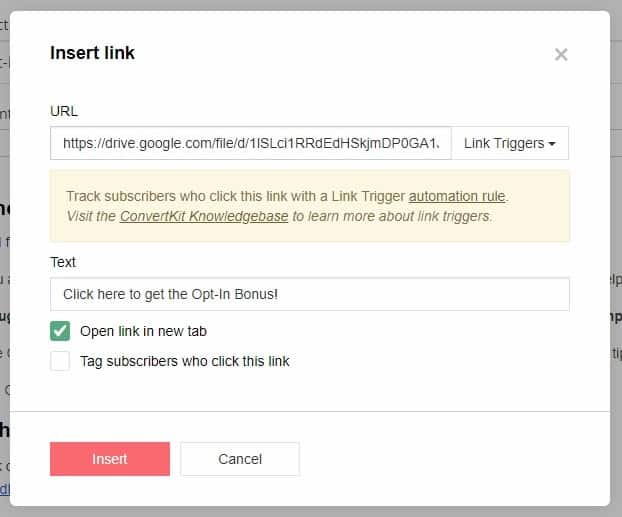
You can now preview your email by sending a test email to your email address or viewing it in the browser by clicking on the preview buttons in the top right of the screen.

Once you’re happy with how your email looks, we can alter a few settings so that the email gets delivered immediately and that it is being delivered from the correct email address.
First, we need to change the email status from Draft to Published.
To do this, select Published from the Status drop-down menu.
Next, we need to set the delivery to immediately.
Select the edit button under When to Send & then change the number of days to zero.
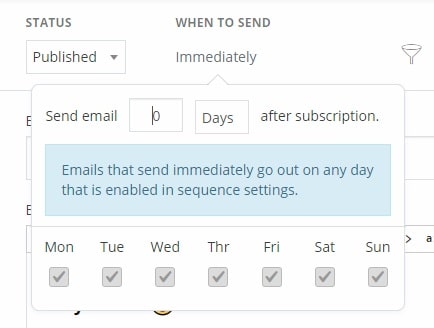
To change the email address that people receive your opt-in bonus from, and where they might reply to, we need to go to the sequence settings.
Select Save All to save your work and then select Settings.
Now you’ll see a drop-down menu where you can select the email address that you’d like to send the email as and the days of the week with checkboxes. If you do not want to send emails on a Sunday, then uncheck that box, and so on.
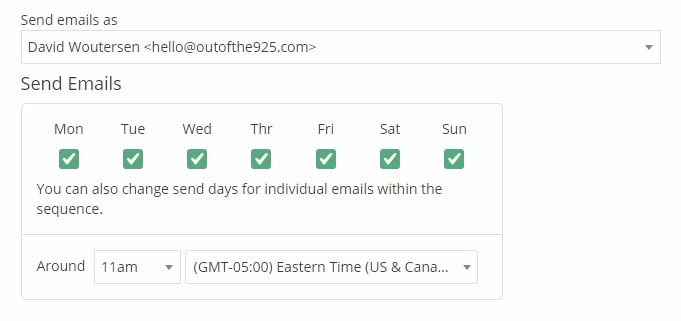
P.s. If you want to use a different email that isn’t in the drop-down menu yet, you’ll need to open your ConvertKit profile & add a new email address.
Once you’re satisfied, scroll down & select Update Sequence to save your settings.
To go back, select Content from the top menu and make any additional changes you may want.
You can add more automated emails to your sequence by selecting Add Email in the left panel, but for this tutorial, we’ll leave it at the opt-in bonus email.
3. Connect The Form And The Email Sequence
We’re almost done, what we need to do now is connect the form we’ve created to the email sequence that we’ve just created.
To do this, select Automations from the main menu at the top of your screen.
Automations are the spider’s webs that tie a lot of the ConvertKit features together.
To create an automation, select New Automation.

On the left, you can name your automation for easy reference and then select Create Automation.
On the next screen, make sure that the Joins a Form option is selected, and then select the form you created for your opt-in from the drop-down menu below.

Select Add Event.
Next, click on the Plus icon beneath the box that just formed, housing your form.

Make sure Action is highlighted & select Email Sequence.
Choose the email sequence you’ve created for your opt-in & then select Add Action.
This creates a connection that tells ConvertKit that when someone signs up for your form, it needs to start sending the emails in your sequence.
There are lots more powerful and fun features that you can explore and implement in the automations area, but we only really need these two in order to create an opt-in form for your website…
One last thing, don’t forget to activate the automation… I can’t tell you how frustrating it is when you forget to do that.
Swipe the switch in the top right corner from Paused to Live to activate the automation. (Select Turn it on! From the pop-up)

That’s most of the work down inside of ConvertKit and we can open up the WordPress dashboard. (www.yourwebsite.com/wp-admin/)
4. Install the ConvertKit plugin on WordPress
The next step in how to create an opt-in form for your website is to actually place the form on your site.
The easiest way to implement a ConvertKit form on your WordPress website is to install the ConvertKit plugin.
Go to Plugins > Add New.
Type ConvertKit into the search bar & then select Install & Activate.
Now we need to join your ConvertKit account with the Plugin.
In the left menu open Settings > ConvertKit.
Here you need to input your API Key & API Secret, you can get these by clicking on the Get your ConvertKit API Key link beneath the field.
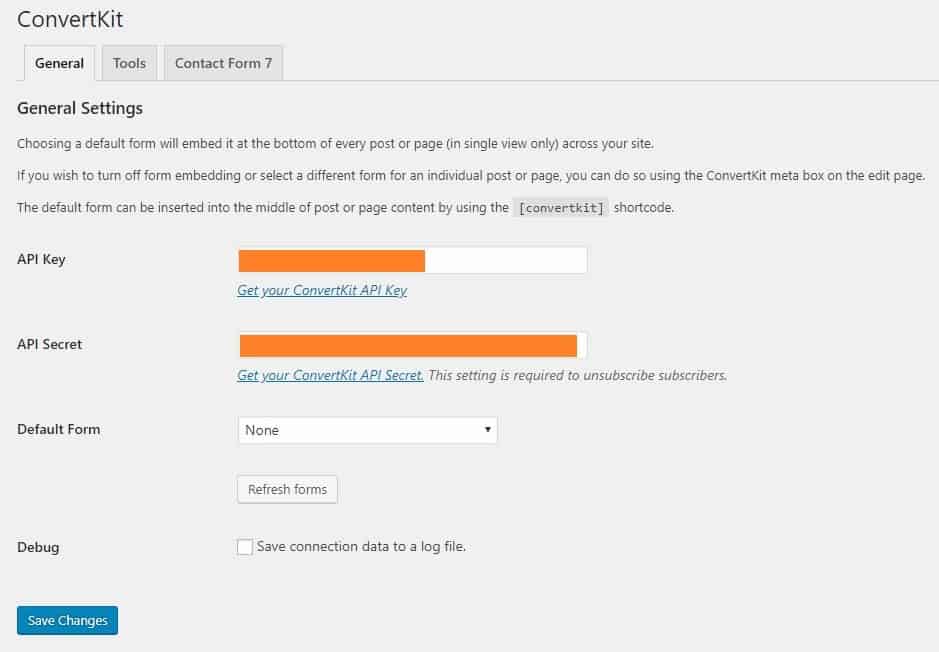
Select Save Changes and now we can start placing ConvertKit forms on your website or blog.
5. Insert The Form Onto a Page Or Post On Your Blog
The last part of this how-to create an opt-in form tutorial is to place the form on a page or post. Here we have a few options & I’ll take you through three of them.
Placing a form at the end of a post or page
You can easily have your form show up at the end of a post or page.
To do this open the page or post. For this tutorial, I’m using a blog post, but the method of placing a form on a page is the exact same.
Scroll down to the bottom of the page and look for the ConvertKit box, select the form you want to show on the post from the form drop-down menu & that’s it. ?

Hit preview to see how it looks and then save changes to the post/page or publish it.
P.s. if you do not see the ConvertKit box in your WordPress Editor, head to the Screen Options tab at the top of the screen and make sure that the ConvertKit option is checked.

How To Place a ConvertKit Form In The Body
Placing your form in the body of a blog post or on a page requires you to get the shortcode of the form from ConvertKit.
We can do this by opening up the desired opt-in form in ConvertKit and selecting Embed from the top bar.

Next, select WordPress & then copy the shortcode that appears in the box below.

Take this shortcode and then paste it wherever you would like it to appear in the form.
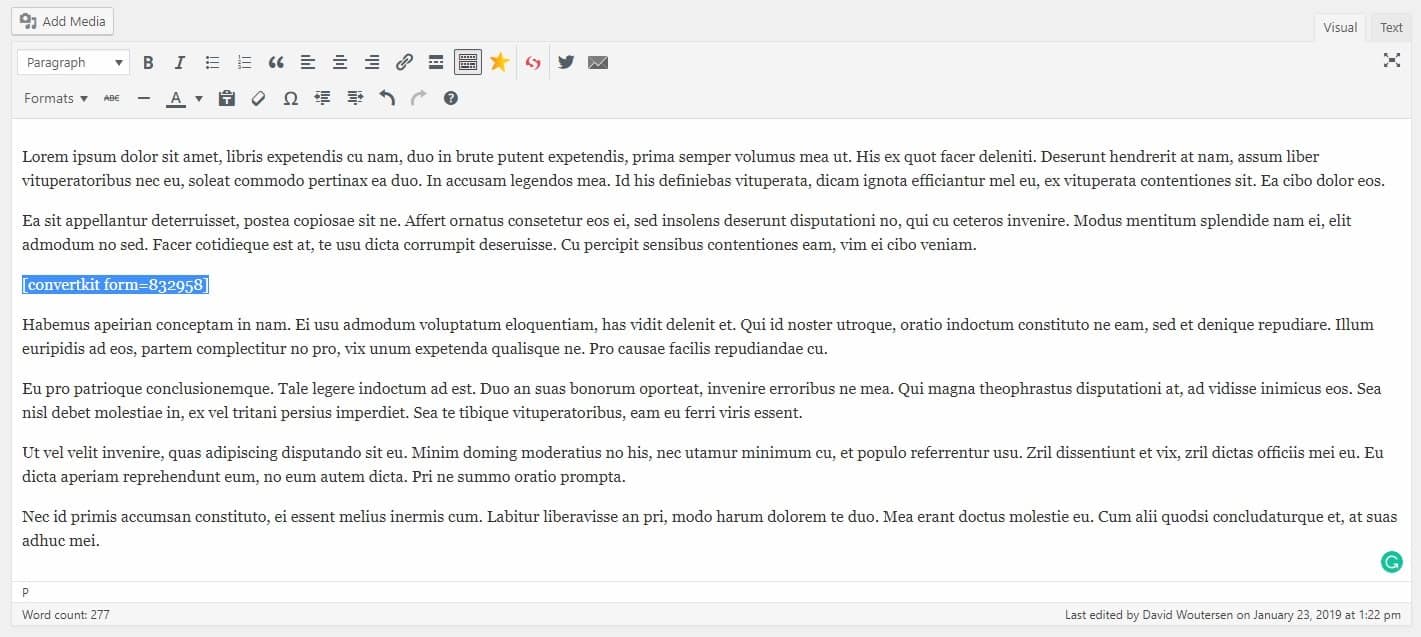
P.s. It doesn’t matter if you use the visual or text editor, although I prefer using the text editor and pasting the code on a new line to avoid any coding errors. ?
Select Preview & you will see that your form now appears in the body of your post.
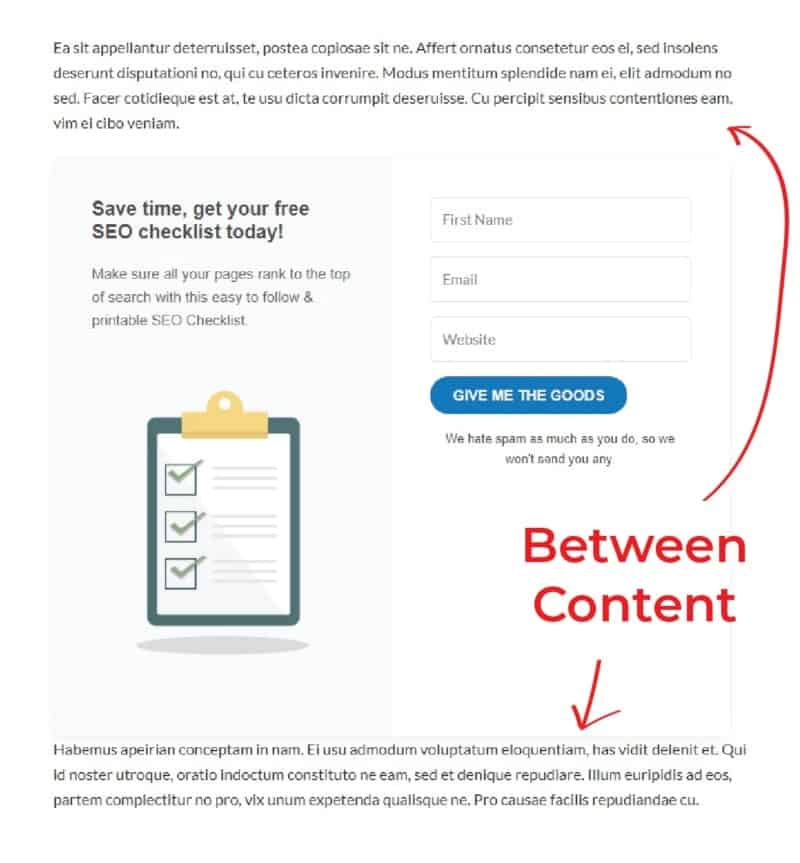
Once you’re done, Save Changes or Publish your post/page.
Placing a Form Inside Of a Widget
Widgets in WordPress are mostly used to place content in the sidebar and in your footer. To place a form in your sidebar, the easiest way is to use a widget.
Select Appearance > Widgets from the left menu.
Drag the ConvertKit Form Widget into your sidebar (or any widget area you want it to appear in).
Select the Opt-in Form from the drop-down menu & give the widget a title (or leave it blank) and then hit save.
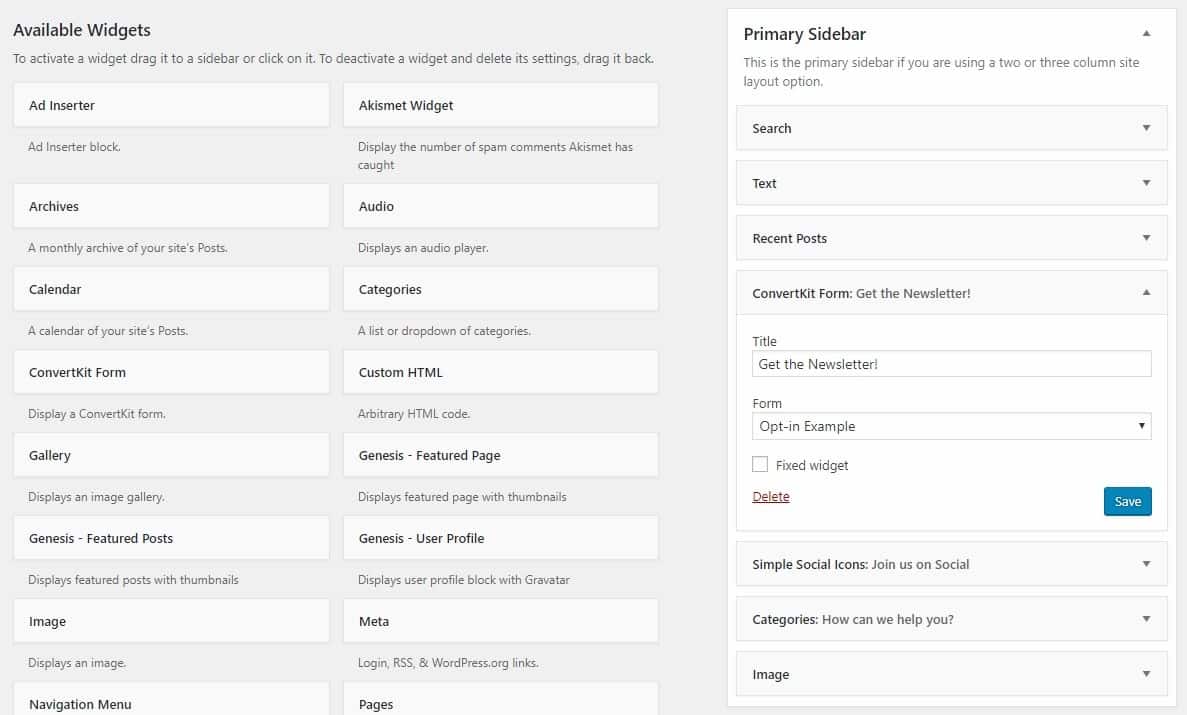
P.s. the widget areas available to you may vary, depending on which theme you are using.
Open a page where your widget is visible to see it live.
I recommend using a Minimal Form for your sidebar or footer, as the Full Form tends to take up too much space. ?
Congratulations, you now know how to create an opt-in form for your website. If you’ve followed along, you have successfully created a content upgrade for your site visitors.
Now as soon as someone opts in to one of the forms you have placed around your website or blog, they’ll receive the first email in the sequence we set up in Step 2 and you won’t even have to lift a finger.
Once you’ve gotten this all set up, you can go back to the email sequence and add some more useful content in some follow-up emails to keep your audience interested. ?
If you haven’t started with ConvertKit yet, find out more here and try it for free.
Now that you know how to create an email lead capture, have you created your first opt-in? What was it? Let me know in the comments below and if you have any questions, please feel free to ask.


